|
|
|
|
|
| Modeling- versus Animation Mode
|
|
|
| See - "Moving Objects or Textures"
|
|
|
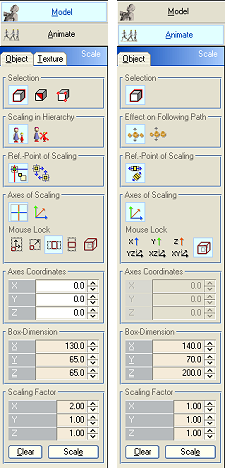
| With help of the new selections in the tool window you can change the size of a marked object selection. The program offers a variety of possibilities to do so. You can, e.g., simply enter the dimensions of the bounding box that surrounds the object selection. Using your mouse to drag the objects to the right size directly in the viewport window is another possibility. Finally, you can enter scaling factors, e.g., enter 2 for the y-axis to double the height of the object.
|
|
|
| The reference point from which scaling will take place depends on wether you are scaling along the world axes or along the object's own axes system:
|
|
|
| Scaling along the World Axes (only in Modeling Mode)
|
|
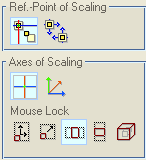
| Select the |
| With help of the "Mouse Lock" buttons you can restrict the scaling directions again. If the left button is active, objects can be scaled in the horizontal and vertical viewport plane. If you choose the second button, objects are scaled evenly in the 2D-viewport plane.
|
| If the third button is active, the vertical mouse-movements are ignored, so objects are only scaled in the horizontal direction. The converse is true for the fourth button. If the last button with the box is selected, objects are evenly enlarged or reduced in all three dimensions.
|
|
|
| Reference Point of Scaling in World Axes Mode
|
| If you scale along the world axes you have two options for the reference point from which scaling will take place:
|
| · |
| · |
|
|
| Example:
|

|
| In the picture on the left you see the initial scene with 6 cylinders standing on a platform. You want to enlarge the cylinders evenly in the 2D-viewport plane, without changing the length of the cylinders. You have chosen the crosshairs as reference point of scaling and moved them to the center of the marked cylinder group. The picture in the middle shows the result after the scaling operation. The cylinders have the correct size now but the scaling operation also drifted them away from the reference point, so you have to reposition them again on the platform. The third picture shows the result after scaling along the object axes of each marked object. Since all objects were scaled from the origin of their own object axes system, all objects stayed in place. In this situation scaling along each object's own axes center was advantageous. However, if you want to scale a group of objects as a whole entity, e.g, if you want to scale a house with all its elements, then you have to scale the whole group from a single reference point, otherwise all elements would grow at their own positions and overlap each.
|
|
|
| Why is Scaling along World Axes only available in Modeling Mode?
|
| In an animation you always need a traceable reference point as well as reference axes that are used to perform the scaling operations recorded in the keyframes. These reference axes systems are always defined by the object's own object axes or the object axes of a parent object, if movements are inherited in a hierarchy.
|
|
|
| Scaling of Analytical Objects
|
| Analytical defined objects will only be scaled, if this operation does not conflict with the mathematical description of the object's shape. This is made clear by a sphere, for example, which if scaled along the X axis is no longer a sphere, but becomes an ellipsoid that can no longer be described simply by its center and a radius. All objects can be increased or reduced symmetrically, of course. Furthermore, analytical cylinders can be scaled symmetrically in their base as well as along their longitudinal y-axis. If an analytical object is scaled in a group with other objects and the scaling would deform the shape of the analytical object then it will only displaced with the scaling movement of the group.
|
|
|
|
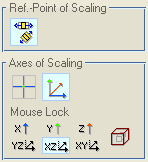
| Select the |
| Via the "Mouse Lock" buttons you can choose an individual axis or a plane in which you want to perform the scaling. For instance, if you want to lengthen a cylinder, you would activate the longitudinal "Y"-object axis of the cylinder but if you want to enlarge only the base of the cylinder, you would activate the "XZ"Mouse Lock button below the "Y" button - then the scaling takes place only in the xz-plane standing perpendicular on the y-object axis.
|
| If the last button with the box is active, then objects are evenly enlarged or reduced in all three dimensions.
|
|
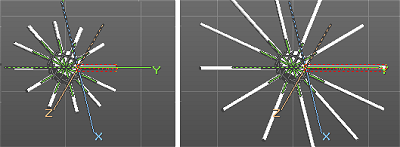
| Example: The illustration shows a hub with 12 embedded spokes. The spokes are somewhat too short and we want to lengthen them along their longitudinal y-object axis, without broadening the circular base of the spokes. When constructing the cylindrical spokes, the object axes of each spoke have been moved already down to the base in the center of the hub. That simplifies the following operations. First we select the "Y"-axis button as the current "Axes of Scaling". Then we mark the 12 spoke cylinders we want to lengthen. Thereupon the object axes systems for all marked objects are drawn. For clarity, only for the reference object the complete axes system is drawn, for all other objects only the selected scaling axis is painted. In the illustration you can see the green y-axis running along each of the spoke cylinders. Now you just need to click into a viewport window and move the mouse - the spokes will virtually grow out of the hub or sink back into it.
|
|
|
| With help of the x-, y-, and z-parameters in the "Box-Dimension" field you can exactly define the dimensions of the bounding box surrounding the marked reference object. If the object has been rotated and is not aligned to the world axes anymore then change to "Axis of Scaling - Scale along Object Axes" mode, so that the bounding box is aligned to the axes system of the marked object.
|
| When you input the dimensions for analytical objects, then all input values will be automatically completed, so that the mathematical description of the object is maintained. If, for instance, you enter the base radius of an analytical cylinder by changing the value for the x-dimension, the z-dimension will be adjusted automatically.
|
|
|
| When scaling a selection with the mouse in the viewports you can simultaneous read the scaling factors from the "Scaling Factor" toolbox.
|
| However, you can also input the scaling-values for the individual axis directions directly via the x-, y-, z-parameters in the "Scaling Factor" toolbox. Then operate the <Scale> button, to cause the change in size.
|
| The <Clear> button in the tool-window beneath the scaling parameter resets all values to 1.
|
|
|
|
|
|
|
|
|
|
|
|
|
|
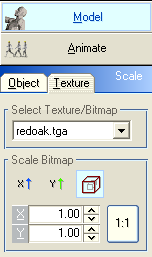
| On operating the "Scale" <Texture> index tab, the content of the tool window changes to that indicated in the illustration above. Instead of a bounding box enclosing the object, now a grid is drawn representing the texture or bitmap and its axis.
|

|
| Use the "Select Texture/Bitmap"-select box to decide whether you want to scale the texture axis for a procedural texture or the texture axis for one of the bitmaps assigned to the object. Supposing you have chosen a bitmap for the selected object in the material dialog then this bitmap will also show up in the "Select Texture/Bitmap"-select box and you can select it for work. A grid similar to that depicted above appears. The dimensions of the grid correspond to the dimensions of the bitmap. It is now very simple to adjust the proportions of the bitmap to suit the size of the object. The scaling is carried out as usual with the mouse directly in the viewports or with help of the X-, Y-parameters in the tool window. The Z-parameter is not required this time, since we only want to scale a 2D picture. Accordingly you can only scale along the two X, Y-picture axes, too. Once the size of the picture is adjusted to the object's dimensions, you can easily move the bitmap in the "Move"-<Texture>-work mode.
|
|
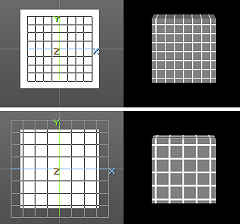
| As you can see in the illustration above, even the scaling of procedural textures is possible. Once you have correctly adjusted the size relationships for a procedural texture in the material dialog, you do not need to repeatedly change back into the material editor to adjust the total size for all parameters. Instead, you can easily scale the procedural texture grid in the "Scale"-<Texture> work mode, resulting in scaling of the entire texture pattern.
|
|
|
| If you choose the <1:1> button, a scaled bitmap will be rescaled to its original size. This is primarily of importance in the particular case when you want to change the projection mode in the material editor to a cylindrical or spherical projection. For example, in the case of a cylindrical projection a bitmap is scaled automatically so that a scaling factor of 1 in the X-dimension would result in a picture perfectly wrapped around the object, with the beginning and end of the picture exactly meeting each another. A value less than 1 would lead to a label effect and a value exceeding 1 would result in overlapping of the picture. The same applies to spherical projections. A value of 1 in the X- as well as in the Y-direction would result in the bitmap wrapping to exactly fit the object. Lower values would again lead to a label effect. With these projection modes you should proceed from the original size, only the reduction in Y-direction for the cylindrical projection being meaningful, or a reduction in both directions when you want to obtain a label effect in cylindrical and spherical projections.
|


